
RBBH Look: Pretty in Luxe
6:39:00 PMHey guys, here is my very first tutorial. I am not an expert, so if you have something to say, please feel free to do so. Your comments will be very much appreciated.
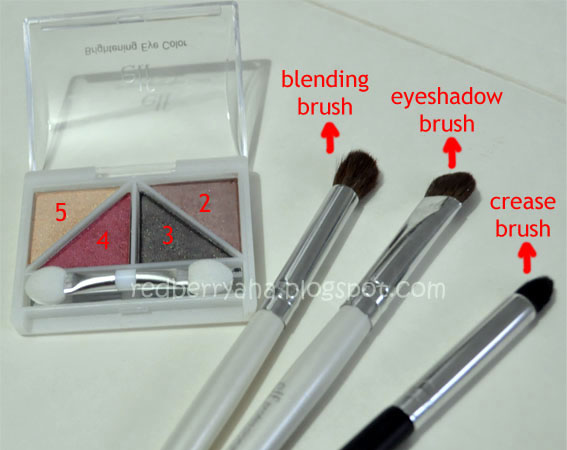
For this tutorial, I will be using the ELF Brightening Eye color in Luxe palette.
Here is the eye diagram for you to better understand.

Before applying your eyeshadow, prime your lids using an eye primer OR use your preferred cream eyeshadow base. In this case I'm using ELF studio line eye primer. Apply all over your lid using either a concealer brush or your fingers.

Step 1
Use a fluffy eyeshadow brush and dip it on to a matte white eyeshadow. Pat on your brow bone and also near the tear duct area. I'm using L.A. Colors Eyeshadow Trio in White Ice.
Step 2
Apply the pinkish taupe color on the inner half of your eyes using an eyeshadow brush.
Step 3
Using a crease brush, apply the olive green color with golden undertone on the outer corner and define the outer-v of your eye using the tip of the crease brush. Gently blend slightly above the crease area.
Step 4
Use a blending brush and pat the pinkish red color on the center of your eye, gently blend to remove harsh edges.
Step 5
Using the blending brush, apply the flesh color above the crease area slightly blending it with the first three colors. Move your brush in circular motion to blend the colors easily for a softer look.
Step 6
Apply a black eyeliner all over the upper lashline. I'm using L.A. Colors black eyeliner pencil. Then top it with a black eyeshadow using an angled eye brush. I'm using Everbilena's single eyeshadow in Cleo.Apply the pinkish taupe color (2) just below your lower lash line using the angled eye brush. Then line your lower lash line with a dark brown eyeshadow for a more defined look. I'm using maybelline's dark brown eyeshadow. (see picture below)

Curl your lashes, I'm using ELF's eyelash curler. Then you have to option either use a black mascara or clear mascara.

Do not forget to fill in your eyebrows
Use any brown eyebrow pencil or brown eyeshadow you have to fill in your brows and finish it with a brow gel to keep it in place.
For the Cheeks
I applied ELF Blusher in Glow, using my angled blush brush on the apples of my cheeks. (you can add a bronzer to contour your face if you want. I will be posting a separate tutorial on how to contour your face)
For the lips
I'm using L.A. Colors matte lipstick in Caramel Cream and topped it with ELF lip plumper.

And voila you're good to go!
Hope I was able to give you some inspiration for your look.Thanks for reading...
Cheerios!!!
***Hollie***


11 Comments
Nice one gurl... I love your choice of color and the way you highlighted areas of focus... Rock on!
ReplyDeleteHey there, I liked what you did and it's awesome, looked good on you! Keep it up.
ReplyDeleteHi pril,you look good on your makeup, its just light, hope to see more...God Bles!
ReplyDeleteThanks gurls, I will definitely make more. I usually go with colors that are wearable, so that everyone can really use it. I will keep on improving.
ReplyDeleteThanks again... have a lovely day.
Cheerios!
Thanks for your Posts..Perfect! I Love mascara, Great eyelash curlers and all things Lashes.
ReplyDeleteYou might want to do a review on the Hot Lashes one..Best I have ever used~! and not too many know about it.
It is my new fav~ The Hot Lashes heated 2 pc lash curler! You may want to read reviews on Amazon.com about Hot Lashes Makeup artist Kit..Absolute best out there~!
They have for me the best sturdy 24K gold metal curler similiar to the Shu Uemura and Sheisdo one. That comes with its own small pink heater base that heats just the pad in the curler..Great Idea! helps my lashes to stay curly till the next day.
Makes my eyes POP and Keeps my lashes curly till the next day. I went to HotLashes.com website..
Major Rave, the cadillac of curlers..so worth the price. My friends and I love love love this one! Best by far,,
HTH~…:) blessings..
Lovely FOTD! =) New follower here! ;)
ReplyDeletemam... don't forget the "inverted V"
ReplyDeleteYou can either use charcoal grey or any dark shade (eyeshadow) and press it onto the outer corner of your eye, creating an inverted V. Slowly, gently blending it inwards and upwards to the socket of your eyelid and blend in well moving to the front of eye lid.
@Sheralee...
ReplyDeleteSorry I forgot to emphasize that on my tutorial and the diagram...
But I did put a shade on the outer "V" if you notice the darkest shade on the ELF palette the one labeled in (3) that's the one I used for the outer "V"... I will that clearer on my next tutorial...thanks for pointing that out.
u look so pretty girl :)
ReplyDeletehttp://www.wiseshe.com
This look great. You do tutorial post way better than I am. Hehe, I tend to oversimplify stuffs.
ReplyDelete@Pepper, thanks, really appreciate it.
ReplyDeleteLeave me a comment and I'll get back to you as soon as I can. ^_^